Reminiscing: High School T-Shirt Quilt

Monday, July 24, 2017

My first big project a few months after getting my first sewing machine for Christmas 2007 was a t-shirt quilt. I was beginning my senior year of high school and I had SO MANY T-SHIRTS that I would never wear again after high school. Throughout the course of middle school and high school I accumulated a lot of shirts in out school colors: green, white, and black.
I remember being pretty excited to graduate high school. Even though I had no use for these t-shirts anymore, we wanted to figure out a way to save them or repurpose them. A t-shirt quilt was perfect!


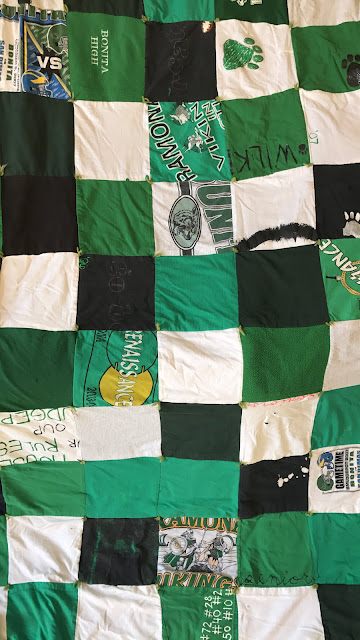
My friend Sadie and I got to work cutting all of our t-shirts into squares to make quilts. I didn't know much about sewing at that point and I forgot to take seam allowance into consideration, so I cut 12 inch squares which ended up being about 10 inch squares once sewn together.

I wanted my blanket to be oversized. I was sick of throw blankets that were only 5 ft. long. It turned out to be a little smaller than a twin blanket.

I love how comfortable this blanket is! The t-shirts were all soft and worn in, so the blanket is, too. For the backing I used a super dense fleece fabric that makes the blanket so heavy and warm. I was unable to find fleece fabric wide enough, so I had to do a little bit of piecing together, but it is hardly noticeable. I did not include batting because I figured it was already heavy and thick enough without it. Each corner is reinforced with a yarn knot.

Yarn knot at each corner
There are a few things I would have done differently. It would have looked better if each knit square was reinforced with interfacing. It would have taken away the stretch of the fabric and given it more structure.
I also would have made it the size of a standard twin quilt.

For years now this blanket has been my go-to for everything! It has spent most of its life in the trunk of my car and comes along on every beach trip.
Each time I use this blanket, so many memories come back to me about going to football games, serving on class council, the ongoing rivalry between Bonita and San Dimas, and the dreaded P.E. classes. I am so glad I chose to keep these shirts and repurpose them.

Nana's Pink Quilt: A Work in Progress

Thursday, July 20, 2017

The third quilt featured in my "Unfinished Quilts" series (the other two here and here)!

Around the same time Oma gave me her two unfinished quilts, my Nana gave me one as well. 
I'm not sure when she started this one, but I'm guessing it was in the 80s or 90s. 


She did manage to finish the tiny pillow that matches, but very few of the squares are attached. As shown in the pattern she sketched in the bottom right corner, she imagined the blocks creating a step pattern. 
The fabric is a lightweight cotton that is super thin and soft. I think I would back this one with a matching bright pink fabric and possibly the binding as well. 
SaveSave

Oma's Flower Garden Quilt: A Work in Progress

Wednesday, July 19, 2017

As mentioned in this post, I've been dying to finish some of my unfinished quilts lately. This fall will be dedicated to finishing a quilt and turning these piles of beautiful pieces into something functional.

This flower garden quilt has been a long time coming. My Oma started it when she was pregnant with my dad in 1964! Can you believe that?!
Once he was born, she got too busy and never touched it again.


The flowers are all made of flannel and corduroy hexagons. It is so soft!

She had very specific instructions for me when she passed it on to me. She wanted dark green hexagons between all the flowers. She imagined it as a garden of flowers surrounded by greenery.
The few green hexagons shown in this picture were all she had, so I am now charged with the task of matching the fabric and hand stitching it all together in the way she wanted it.

Some day soon, I will have some progress pictures to share!

Oma's Polyester Hexagon Quilt: A Work in Progress

Tuesday, July 18, 2017

I've never been big on making quilts. I think a quilter needs to be exact when it comes to measuring, cutting, and sewing and I am not that kind of seamstress. But I want to be!

I have been thinking about some of my unfinished quilts lately. 
Over the last few years, my Oma has given me many of her sewing supplies, including her serger, boxes of fabric, patterns, and a few unfinished quilts. 
One of the unfinished quilts she gave me was this beautiful, colorful hexagon quilt. 


The polyester textiles remind me of the 1970s (possibly the decade this quilt was started). It has hundreds of different patterns and colors and I love the way the randomness comes together!

This quilt was started by my Oma's sister who lives in Holland and she gave it to my Oma to finish (not sure how long ago). When I got it, I was surprised at how large it was. I was even more surprised when I found piles and piles of more hexagons to be added to the quilt. 

Each individual piece is basted to a hexagon-shaped piece of card stock. 
All of the pieces are hand stitched together. As I've worked on this quilt, I have removed the card stock once the piece has been added to the quilt. It has been fun to see it slowly come together. 

Close up details of some of the textiles in the quilt, basting stitches still in place
For a while, my sister and I would add to the quilt each time we visited my parents' house. 
Lately, I have been eager to make a quilt. I have very little experience with quilting, but I really appreciate the intricate details of a beautiful quilt. 

Basting and card stock removed
My goal for this Fall is to make a large quilt. I have four unfinished quilts that I could finish, or I can make a whole new one. I have been finding some cool options on Pinterest, like this gingham one and this colorful one

Viviana's Wedding Dress Alterations

Monday, July 10, 2017

Viviana got married last weekend!
Her dress was so gorgeous! it was an ivory lace and tule dress with a tan lining. She wanted to add more lace to the neckline and hem the dress to be a shorter, even-length hem. 

The dress before any alterations, hem pinned to new length
The neckline detail with the tule extending up to the collar bone
Adding Lace was a fun, time consuming change. I was able to use one large piece for the majority of the add-on with individual flowers added along the existing lace and the neckline edge.
I pinned all of the lace pieces in place and spent some time perfecting it so that it looked even and beautiful. I used invisible thread to attach the lace. 

Lace pinned in place
Lace addition complete!
After the lace was completed, it sat untouched for a few days because I knew I would want to do the whole hem at once and not have to do it in 30 minute increments. 
One day while Peter slept, I cut the hem... TEN INCHES TOO SHORT! 
I don't know how I made such a huge mistake or where my mind was, but I caught it after I had made a two food long cut through both layers of the lining skirt. 
As soon as I realized what I had done, Peter woke up and I didn't get a chance to fix it that day. Spending a few days thinking about it and brainstorming how to fix it helped in the long run because I was not frantic and I knew exactly how I was going to patch it.

My sister-in-law came to watch Peter so I could spend half a day sewing. First thing I did was baste some extra fabric from the hem onto the hole so I could make sure it was still laying flat. 

The dreaded hole, temporarily based shut with extra fabric from hem as reinforcement
Next, I used some more extra fabric and I practiced a few different techniques and stitches to see what would hide the scar best. 
The did a machine stitch on the underneath layer, but hand stitched the top layer because it was the most hidden. It took quite a long time, but it turned out great and hardy noticeable. Once both layers were patched, I hemmed the skirt and closed up the skirt. All of the patch work is concealed between the two layers, giving it a pretty good finish.
The hem is even all the way around the dress and I top stitched to give the edge a nice crisp line. 

Lining hemmed! Ready to hem tule layers
Cutting the tule was very simple because there is no finish at the hem. I went back and forth between handing it up to laying it out on the floor to get the perfect, even length. 

The finished project:


Bet you can't even locate the patch!

Viviana looked amazing in her dress! It is such a gorgeous dress, and, despite the colossal mistake I made, everything else turned out perfect and the patch is almost impossible to spot, even to someone who knows exactly where it is. 

Theme by: Pish and Posh Designs