My Favorite Skirt

Monday, November 27, 2017

My favorite skirt has been my favorite since 2012 when I made it. 
It is a simple circle skirt made from a heavy textured fabric I found at a thrift store during my college days. It is the perfect weight for a flowy circle skirt and has the most beautiful drape. 


The pattern for a circle skirt is so simple. A true circle skirt would not have any seams or closures and would probably have an elastic waist. I made mine with a waistband and an invisible zipper at center back. It has side seams and a center back seam.
I took my waist measurement and used one fourth of that measurement as the width on the back and front pattern pieces. The skirt front piece was cut on the fold and the center back had some extra seam allowance for a center back seam. 

I wear this skirt on a regular basis and have yet to find a skirt I love more, store-bought or handmade. I do, however, need to replace the zipper sometime soon. When I do that, I will also let the waist out a little bit. It was always a tad bit too tight..


When I hold the skirt out, it shows how full it really is. I love the fullness!

My parents' yard was the perfect dreamland to take a few pictures after church. My husband was so sweet to take these pictures for me. 
Also, I had to get a few twirling shots to demonstrate the beauty of this skirt.


Quilt Facelift

Tuesday, November 14, 2017

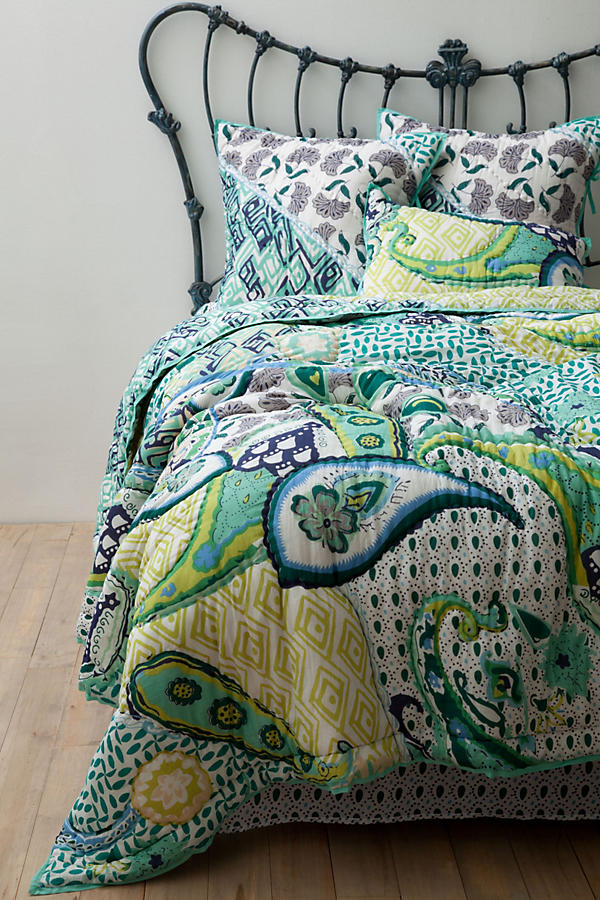
My mom has a beautiful bedspread that she got from Anthropologie a few years ago. We are always on the lookout for their discounted quilts and bedspreads because they are beautiful and well made.

Source
After only a year or so of owning this bedspread, she noticed it was starting to fall apart. The fabric is so thin and the minimal hand-quilting is so sparse. 
*My mom also ran it through the washer when the label said dry clean only, but still!*
All of the batting clumped up and slid to one section of the bedspread because there was not enough quilting to keep it in place.

After I removed the binding and the top layer of the quilt, you could clearly see how shredded the binding was
I decided to take it apart and reconstruct it into a new and improved quilt.

I got enough white fabric to reinforce both the top and the bottom of the quilt. 
Then I laid each of the two layers out flat and placed the white cotton reinforcement fabric on top and safety pinned every foot or so to keep the fabric in place. Once both layers were reinforced and pinned, I placed the new batting in between the two layers and re pinned, this time pinning all the layers together (the top of the quilt, reinforcement cotton, polyester batting, reinforcement cotton, bottom of the quilt).
*My mom and I chose to use polyester batting because we felt it may be sturdier that cotton batting.* The original batting was cotton and fell apart much easier than polyester would have. This is because cotton fibers are short and polyester fibers are long. 
Once all the layers were pinned together, I was ready to start some light quilting.
I followed some lines in the design on the underside of the fabric  and also created perpendicular lines forming diamond shapes.

Grid quilting detail
I had some difficulty with my machine as I was half way through the quilting process. The tension was off and I couldn't seem to fix it, so I took my machine in for servicing and... the problem was still not fixed!

Bad tention results
So I left the quilt unfinished for over six months.

When I finally gave it another shot, I was able to finish the grid quilting with no more tension issues. Hopefully my machine keeps working properly So far so good!

For some reason, I assumed reattaching the binding would be quick and easy, but it was not! There are so many layers on this quilt. It was difficult to get them all to line up perfectly and cooperate. Like I mentioned earlier, This fabric is very thin and delicate.
First edge of the binding attached
After stitching the first edge of the binding to the quilt, I pinned the other side down and attempted to stitch in the ditch to attach it. However, this method did not work well with this fabric. The fabric kept moving, despite my pinning efforts.
After only a few minutes of trying that, I decided it would be better if I tried something a little more forgiving than stitching in the ditch. I decided on a zig zag stitch.

Zig zag stitch to finish off the binding
I finally finished it! I'm embarrassed to admit how long I've had this unfinished quilt in my hands...
It is such a relief to finally have it finished. It is definitely not perfect. I ran into several obstacles along the way, but it is more durable than before and my mom is thrilled to get more life from her favorite bedspread.
It should even withstand my mom's machine washing.


SaveSaveSaveSave

Felt Sea Creatures

Monday, November 13, 2017

Around the same time I made this, I also started to make a baby mobile. I really liked these ones so I started to make little sea creatures out of felt.


Now, nearly a year later, I still haven't done anything with them. I had five little sea creatures hanging from string just waiting to be hung on a mobile. Maybe it was because we have been sharing a room with Peter, or maybe its simply because I wouldn't know what materials were needed to make the rest of the mobile. Whatever the reason, they've been collecting dust.

We are finally moving to a bigger place and Peter will be getting his own room! Long overdue. However, I still gave up on the mobile idea. Instead, I cut the stings off and just threw them into Peter's toy basket. He loves all the little toys that he can hold easily, examine, and (of course) put in his mouth! It makes me so happy to watch him play with these little creatures I made for him.

The turtle is his favorite so far! Also, Christmas jammies are fitting him early. He is growing too fast!
I made a whale, two types of fish, a starfish, and a sea turtle.
The whale was my first attempt. The shape is a little awkward, but I like the contrasting stitching. The turtle and the striped fish are my two favorites.


I plan on making Peter a lot more felt creatures. The next ones will be bigger and more three dimensional. 

Halloween: A Spider, His Web, and His Prey

Saturday, November 11, 2017

My first of many homemade halloween costumes for Peter!
We decided to go as a spider, his web, and his prey.
Being in the pest control business, we thought the spider theme was a perfect choice for the family. 

I was so excited as soon as we came up with the idea for these costumes. The first thing I did was look through my craft and sewing supplies to see what I already had that could be used in making the costumes. I found some felt, some fabric, some wire, and some ribbon that I figured might be helpful.
I was able to make the wings with supplies I already had. I used some wire to shape them and then made the fabric cover out of white tricot fabric. I then used a black sharpie to draw the wing details.


Close up of the wing detail. Not perfect, but it turned out pretty good!
The wings would be pinned to the back of Jesse's shirt.
Next I made the fly's big eyeballs. I cut four circles out of a dark red fabric, the same fabric that I cut Peter's hour glass out of. Of the four red circles, two were bigger and two were a little smaller. I attached each small circle to a big circle, turned them right side out, stuffed them, and drew a honeycomb pattern on them. Then I glued them to a beanie. That was it for the prey's costume! 

For my web costume, I cut a giant circle from two yards of fabric to make a poncho. I cut evenly spaced curves around the edges and sewed white yarn around the whole outer edge and the rest of the poncho in the shape of a web. This was the most time consuming part of the process, but I think it turned out great.

I used the leftover fabric from the poncho to make the extra legs for Peter's spider costume.

I stuffed the extra legs and glued them onto a black outfit I bought for Peter.
I also hand stitched the hour glass onto the stomach.

It was so cute to watch Peter crawl around in his spider outfit. It is the perfect costume for a baby in the crawling phase.


All three costumes done!  Jesse is wrapped up in yarn as the prey. We even went a little farther and put a tiny bit of fake blood next to Peter's mouth and on Jesse's neck!
We got one quick picture on our way out to trick-or-treat, but mostly just to say hi to friends in the neighborhood. We got in the car to drive to a few houses and Peter fell asleep immediately! We visited one family and then went home. 
We are so excited for next halloween when we can take Peter trick-or-treating!

Theme by: Pish and Posh Designs