Showing posts with label alterations. Show all posts

Viviana's Wedding Dress Alterations

Monday, July 10, 2017

Viviana got married last weekend!
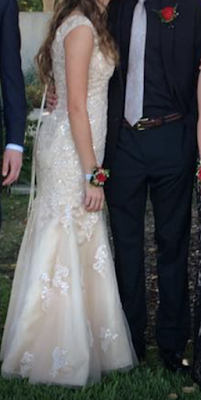
Her dress was so gorgeous! it was an ivory lace and tule dress with a tan lining. She wanted to add more lace to the neckline and hem the dress to be a shorter, even-length hem. 

The dress before any alterations, hem pinned to new length
The neckline detail with the tule extending up to the collar bone
Adding Lace was a fun, time consuming change. I was able to use one large piece for the majority of the add-on with individual flowers added along the existing lace and the neckline edge.
I pinned all of the lace pieces in place and spent some time perfecting it so that it looked even and beautiful. I used invisible thread to attach the lace. 

Lace pinned in place
Lace addition complete!
After the lace was completed, it sat untouched for a few days because I knew I would want to do the whole hem at once and not have to do it in 30 minute increments. 
One day while Peter slept, I cut the hem... TEN INCHES TOO SHORT! 
I don't know how I made such a huge mistake or where my mind was, but I caught it after I had made a two food long cut through both layers of the lining skirt. 
As soon as I realized what I had done, Peter woke up and I didn't get a chance to fix it that day. Spending a few days thinking about it and brainstorming how to fix it helped in the long run because I was not frantic and I knew exactly how I was going to patch it.

My sister-in-law came to watch Peter so I could spend half a day sewing. First thing I did was baste some extra fabric from the hem onto the hole so I could make sure it was still laying flat. 

The dreaded hole, temporarily based shut with extra fabric from hem as reinforcement
Next, I used some more extra fabric and I practiced a few different techniques and stitches to see what would hide the scar best. 
The did a machine stitch on the underneath layer, but hand stitched the top layer because it was the most hidden. It took quite a long time, but it turned out great and hardy noticeable. Once both layers were patched, I hemmed the skirt and closed up the skirt. All of the patch work is concealed between the two layers, giving it a pretty good finish.
The hem is even all the way around the dress and I top stitched to give the edge a nice crisp line. 

Lining hemmed! Ready to hem tule layers
Cutting the tule was very simple because there is no finish at the hem. I went back and forth between handing it up to laying it out on the floor to get the perfect, even length. 

The finished project:


Bet you can't even locate the patch!

Viviana looked amazing in her dress! It is such a gorgeous dress, and, despite the colossal mistake I made, everything else turned out perfect and the patch is almost impossible to spot, even to someone who knows exactly where it is. 

Emily's Wedding Dress: Adding Sleeves

Wednesday, May 31, 2017

Emily got married last weekend! 
During the wedding dress shopping stage, they were sending me pictures of any dress that she liked and we would quickly brainstorm what could be done to make the dress modest. She sent a few pictures of different dresses, and then she found THE DRESS. It was the perfect length and the bodice fit her like a glove. The only work that needed to be done was adding sleeves. Granted, that is a huge job, but it can be done!


She fell in love with the beading detail and the overall silhouette. Adding sleeves wouldn't be too much trouble because the front is not too low cut. I was confident right away that I would be able to create sleeves that would match the dress almost seamlessly. I did a similar alteration on a prom dress last year. 

We had two fittings with a cotton mockup of the upper bodice. The first draft was way too big and the second one fit her almost perfectly. After making minor adjustments to the second mockup, I finally cut the pieces out of the white satin, using the cotton as the pattern and eventually the underlining.

The first change I made to the dress itself was to remove the beaded flap from the neck edge. Even though it was a gorgeous detail, we all agreed the dress would look better without it once the sleeves were added. Luckily, the beading extended underneath the flap so I didn't have to re-bead the bodice.
I wanted to reuse the beads from the flap so I spent a lot of time removing those.

Once the satin outer layer was attached to the lining and the finished sleeves were sewn on, I then pinned it in place on the dress.

Shoulder pieces pinned to the dress ready to be fitted and sewn
After she tried it on one more time, I had a few adjustments to make. Once those were made, I had her try it on one last time! This time I was confident with the fit so I finally attached the piece to the dress. After that, I began beading!
The beading was easy, but oh so time consuming! I continued a border around the neck edge to make it look continuous. I also continued some of the bodice beading over the seam onto the shoulder pieces. This made it look as though the dress came with the shoulders and sleeves (I REALLY didn't want it to be obvious that sleeves were added).

After I finished beading, I hand stitched the lining fabric closed, added a few hooks and eyes, and it was finished! With not a moment to spare! Thankfully, she was a very easy-going bride so she didn't seem to mind too bad that I got the dress to her only a few days before the wedding.

Days before the wedding. Its finally finished!

I am so happy with how it turned out. I am so proud of the beading especially! I was sure to text a few update pictures to the bride as I made progress. This close up of the beading was one picture that I sent to her. 

Some of the beading detail

Congrats, Emily! So happy I got to be a small part of your big day! Now that I am finished, I think I might reward myself with a new dress...

Second Annual Prom Season

Thursday, May 25, 2017


Prom season just came and went!
Lately I have been so busy with taking care of my almost three month old that it is hard for me to find time for my projects. Its been really stressful because I've had some MAJOR projects: altering two prom dresses and building sleeves onto a strapless wedding dress. 
During our busy season for our business (April through August), my husband doesn't get home until 8 or 9 at night. Most nights he comes straight home and is on "Peter Duty" for the rest of the night. If Peter needs something, he happily takes care of it so I can sew.  

A few weeks ago I finished my work on the prom dresses and it turned out great. 

Source
The beautiful result!

The first dress was a beautiful blue floral dress.
I hemmed the dress about three and a half inches and added blue satin underneath the sheer part of the bodice. It matched the lining fabric so perfectly!

The second dress I altered was a champagne lace off-the-shoulder dress with a train.

Source
I raised the lace off-the-shoulder detail to cap sleeves. Along with that, I removed some of the lace from the neckline to expose the sweetheart detail.
The hem had a beautiful train, but it may have been a bit over the top for a high school prom. I evened the hem to be straight across.


The lined cap sleeves and even hem

Baby Sleeper Pattern Adjustment

Tuesday, January 3, 2017

Like I mentioned in a previous post, the proportions of the baby sleeper pattern need some adjusting. Since I have been accumulating tons of clothes for my baby, I was easily able to compare my handmade sleeper to other clothes to determine how it needed to be adjusted. 
The body width and length would fit a six month old, but the arms and legs only fit a three month old. 

The sleeve and the bodice/legs pattern pieces
If I add about an inch to the arms and legs, They would be better proportioned to the body. 
I cut both pattern pieces and added an inch and a half length. I made sure to cut them in an area that would only be sewn at the arm and leg seams. I did not want to affect the way any pattern pieces were attached together. 

Bodice cut, extra paper added to the sleeve
Here are the before and after comparisons:


Super simple and quick fix! 
I think this small change will make a bid difference in my little sleepers. 

I went to LA with my sisters in law a few weeks ago with grand plans for projects I had in mind for myself. However, I ended up coming home with only fabric for my baby, so I have lots of options to choose from to test out this new and improved pattern.


Patterns

Saturday, July 9, 2016

My pattern making process begins with the idea, inspiration, or sketch. When I see something I like or imagine a piece of clothing I want to make, I immediately think about the pattern. I try to picture what the pattern pieces will need to look like in order to get the look and fit I want. 


I made these slopers in my Fitting and Alterations class in college. We got basic store-bought patterns with bodice front and back pieces, skirt front and back pieces, and a sleeve. We also did the same for pants, but I have yet to use those slopers.. My body has changed a lot in the last few years since making these and I'm afraid they won't be the right fit anymore. 
We cut the pattern pieces out of cheap fabric and used markers and lots of basting stitches to get the perfect fit. Among other things, I matched the waist line to my exact waist, I moved the shoulder seam to the perfect place and I adjusted all the darts. Once I got the right fit, I transferred the patterns onto card stock. Now they are durable and ready to be used over and over again.

The most important tool in pattern making is the tissue paper! A few years ago, I went to a medical supply store and purchased a roll of tissue paper that is used to cover patient's beds. Best purchase I ever made!


Along with tissue paper, I also use a ruler, gridded cutting board, tape, scissors, and a pencil. 
I still refer to my old pattern making textbook regularly.


It gives instructions for everything: adjustments for knit slopers, all kinds of sleeves and necklines, changing the type of dart, the shape of the skirt, you name it!

I try to create variety in the clothes I make for myself. I am drawn to simple fabrics, usually solid colors. I try to make something unique and different each time, especially when the fabric is simple. I recently made a wrap dress and that was a new experience for me. I had never made a wrap dress, never tried flutter sleeves, and don't have much experience with chiffon. It was so fun to try something new, and I referred to my book for pattern adjustments along the way. 


Once I've made and used the pattern, I store it in a plastic bag, give it a name, and store it away in my overflowing drawer of patterns. 
I prefer making my own patterns over using store-bought ones because mine are simpler to use, they fit me perfectly, and it allows me to design my own wardrobe!

First Annual Prom Season: Success!

Tuesday, June 14, 2016

Prom just passed! I did a few alterations for some of the girls from church. I know how hard it is to find a modest, beautiful prom dress and it felt so good to be able to transform these dresses. 

Becky's dress:
Before
After!
Becky's dress was a beautiful bright coral color. I raised the hem 4 inches and built up the shoulders and sleeves. I was really nervous to do such a major alteration, but after searching for some pictures of added sleeves and seeing this post, I knew it would look great.
I'd never done anything quite like this before, so it was definitely a learning experience. I am so pleased with how it turned out, though! The fabric had a lot of stretch, so I had a lot of piecing to do. The seams throughout the shoulders, however, make it look uniform with the criss-cross detail on the bodice.
When I was all finished, I had a piece of fabric smaller than my hand left over. It was a close call!


Kimmy's dress:


Before...
I forgot to get an after picture of Kimmy's dress... But I raised the hem 6 inches and added 1 1/2 inches to the neckline. I ruffled the added piece so it would look uniform with the rest of the bodice.

The Sunday after Prom, all the young women wore their gorgeous dresses to church! It was so fun to see everyone all dressed up.
Since then, I've gotten a few inquiries each week about alterations or projects from people at church. I've learned over the years that sewing skills don't need to be advertised. Once people learn that I sew, they never forget! 
In college, I lived in a house with eleven roommates (yes, ELEVEN!), and I kept busy with all of their projects each semester. Regularly, I would come home from classes and find a skirt and two pairs of jeans at the foot of my bed in need of some repair. The word is slowly spreading and I have a feeling I will be very busy with projects from now on.

Theme by: Pish and Posh Designs